To capture the beauty of a Landscape there are certain guidelines that you have to remember. The most essential is shooting at dawn or dusk when the run is near the horizon. However, not everybody has the luxury of getting up early or staying back late to shoot at these times. Those who do that’s great you can probably stop readying here but if you are like me (balancing family, work and household chores) you should keep reading.
So if you are reading on that means you normally will shoot later morning, noon and even late afternoon. This means that the sun is going to be relatively high up in the sky and shadows will be strong. Shooting Bracketed for example -1, 0, +1 or -2, 0, +2 means that we can capture more details on the Landscape that are visible to our eye but not necessarily to our camera. These multiple exposures can then be blended together to create the final image closer to what our eyes can see. Or often turn it into a High Dynamic Range (HDR) image.
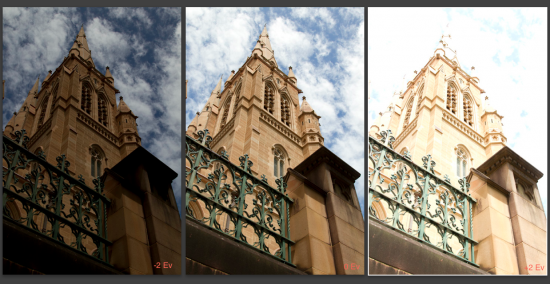
Here is an example of a three bracketed shots I took of St Michell’s Cathedral near Hyde Park in Sydney. The left image is -2, centre is 0 ie Normal exposure and right image +2 exposure. If you just focus your attention on the centre image, it’s what Camera thinks as Normal Exposure, however you can see that the lower half of the image (fence and pillar) are under exposed and there is details there in the shadows which can be brought out. The top half clouds are slightly too bright ie. overexposed, however the tower looks good.
 The clouds are correctly exposed in the left hand image (-2 Ev) and the fence and pillar are nicely (although slightly over) exposed in the right hand image. Overall the three images contain elements that when put together into one image should produce a more pleasing final result.
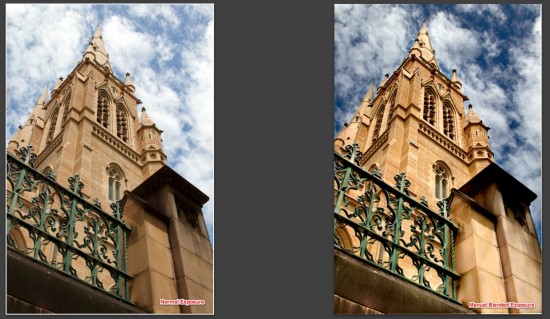
So to blend them together we can open them layered in Photoshop and using Masking to blend the images together. You can also select all the three layers and use the “Auto-Blend” option in the Edit menu which will automatically access the three images and create a final blended image with masks. In some cases that works very well and then you just need to tidy up a few items where Photoshop may have got it wrong or over done things. However, the below image was a manual blending using Masks of the three images together.
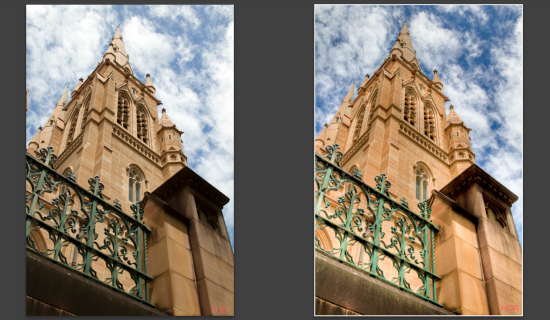
Now if you take the three original exposure images and run them through something like Photomatix or HDR Pro in Photoshop, you will get a merged High Dynamic Range Image. This also will help make the photograph more appealing and feel real to the viewer. See below the comparison between the Normal vs HDR image.
Now let’s compare all three images together to see the difference. Let us know your thoughts on which image you find most pleasing.


