
If you are using Lightroom version 3 or above, there are many shortcuts available in Lightroom. All of them are listed under “<ModuleName> Module Shortcuts” in the Help menu eg. Develop Module Shortcuts.
However these shortcuts are not easy to print and therefore require memorising or writing down so that you can work faster in Lightroom. The Shortcuts below are the ones I call my top “Must know Lightroom Shortcuts”. I use these and many other keyboards shorts in my workflow and frankly I can’t live without them now. If you can memorise them that’s brilliant otherwise just keep a print out of the cheat sheet (below) until you know them off by heart.
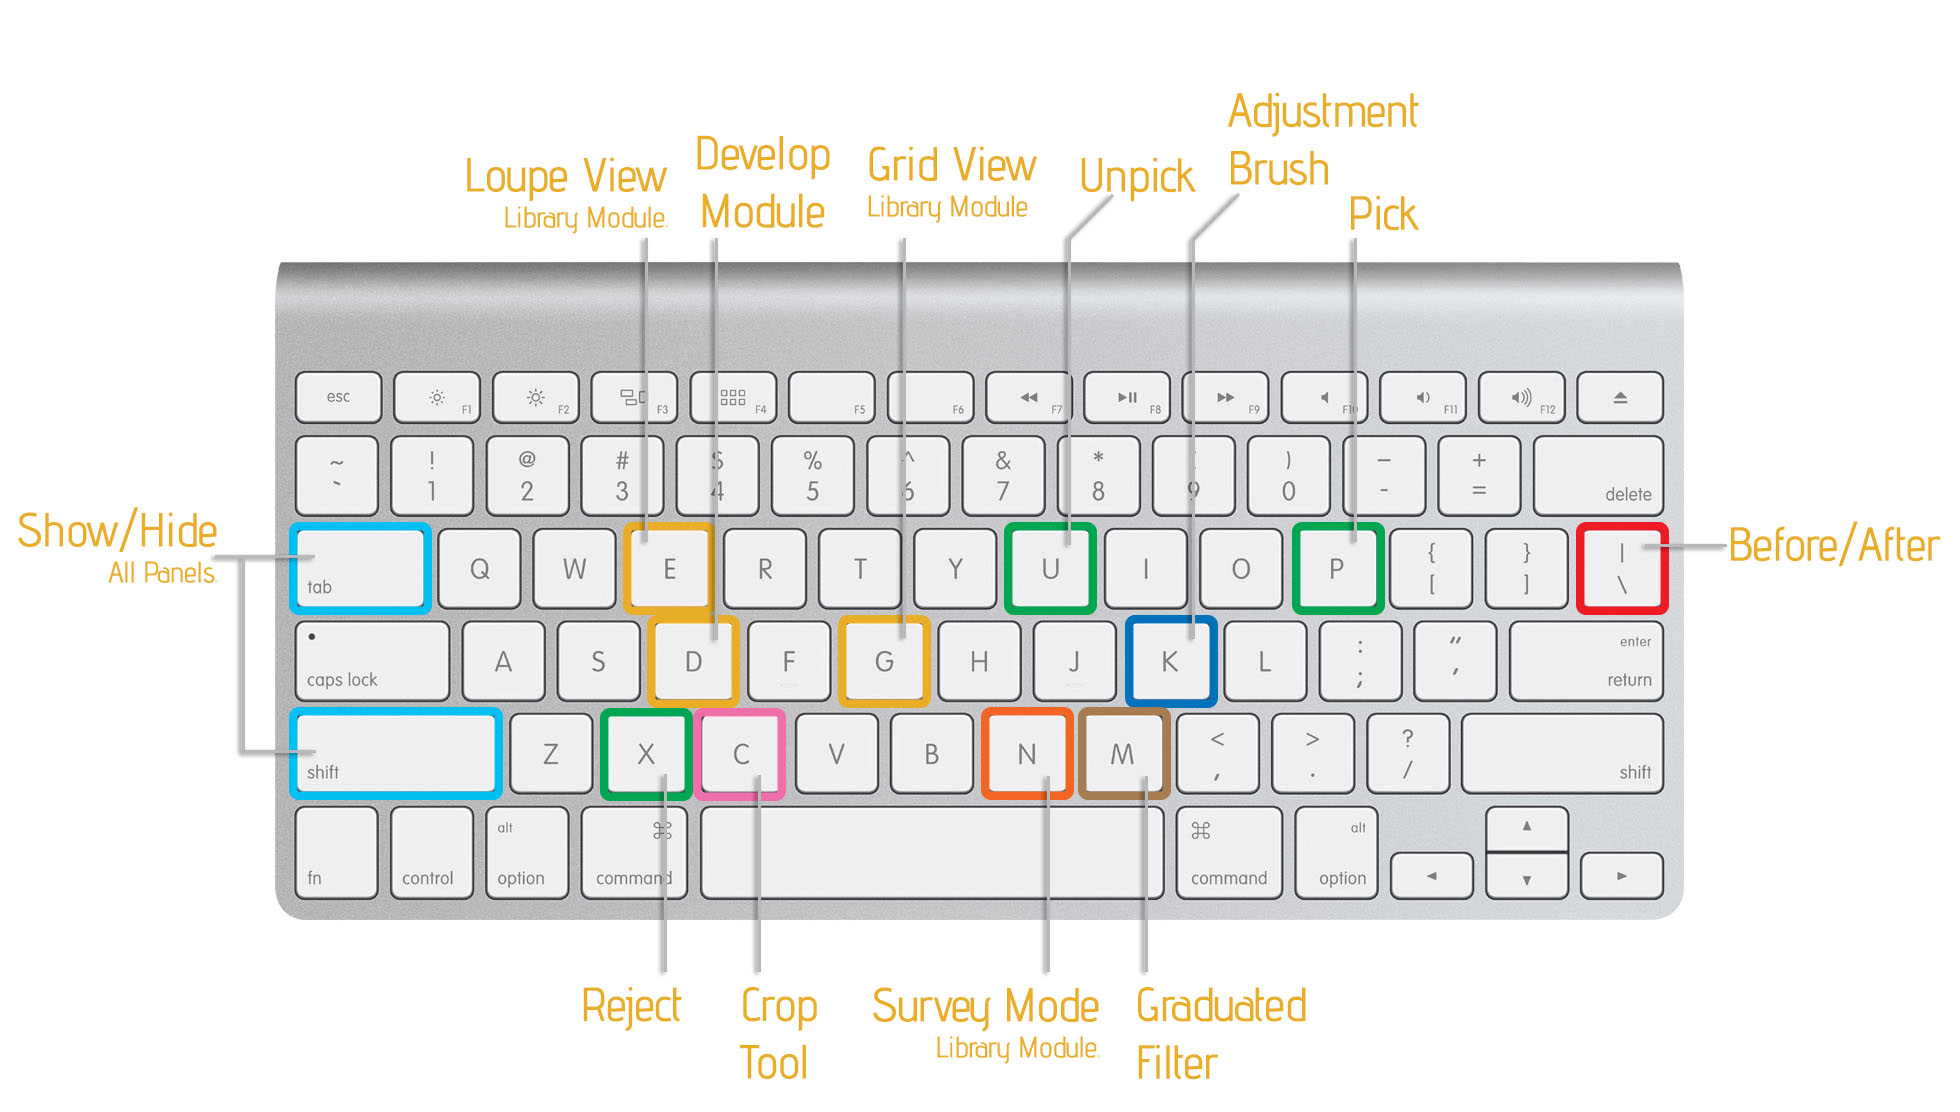
I’ve colour coded the Info-graphic below so it is easy to memorise the shortcuts that work together.

Switching between Modules
The two main modules that you will switch between constantly are the Library and Develop modules. You can use the top toolbar to navigate between the two but using the keyboard shortcuts is much faster.
- G – Press ‘G’ to jump to Library module in Grid View
- E – Press ‘E’ to jump to Library module in Loupe View
- D – Press ‘D’ to jump to Develop module
Faster Flagging
In the Library and Develop modules you have the Flagging options that allow you to mark your photos as Picked or Rejected or Unpicked. Use the keyboard shortcuts to do this much faster
- P – Press ‘P’ to flag an image as Picked. An image you definitely will edit and/or share
- X – Press ‘X’ to flag an image as Rejected. An image you will most likely delete eg. out-of-focus, underexposed or eyes closed etc.
- U – Press ‘U’ to Unpick a flagged image. In case you accidentally picked/rejected an image.
Couple this tip with the next team and you can work even faster.
Turn On – Auto Advance
Turn on Auto Advance from the “Photo” menu in the Library Module. This will allow you to flag your images much quicker as Lightroom will jump/advance to next image as soon as you flag an image as Picked/Rejected/Unpicked
Before/After
See the progression of your edit by comparing Before and After. Press the ‘\’ to quickly switch between before and after.
Hide all Panels
Press Shift +Tab to quickly hide all the panels (top & bottom, left and right) to leave you with nice big screen space for reviewing your photos or doing any detailed Brush work. Press the same again to reveal the panels.
Tip: Use this technique in Grid view to review your photos quickly and flag your picks and rejects quickly.
Cropping
No matter which Module you are in, you can press ‘C’ to be taken to the Develop module and Crop tool will be active.
Adjustment Brush
No matter which Module you are in, you can press ‘K’ to be taken to the Develop module with the Adjustment Brush active.
Gradient Filter
Same as above, no matter which Module you are in, you can press ‘M’ to be taken to the Develop module with Gradient Filter active.
Tip: Hold the ‘Shift’ key to create a perfectly Horizontal or Vertical Gradient.
Survey Mode
Ever have a selection of images that are similar and you need to pick the best one. Select all the photos using Shift or Ctrl/Option and then press the ‘N’ key to start reviewing your images. Hide all the panels using the Shift+Tab key to give yourself more room.
Now the best way to get to the best photo is to work opposite of that. Find the photos you don’t like and remove them by clicking on the little ‘x’ in the bottom right corner of image. By removing the photos you don’t like you eventually end up with the one you like best.
Download Lightroom Shortcuts PDF – Cheat sheet
Don’t forget to share, your support helps us create more content.
Lightroom Keyboard Shortcuts (614 downloads)


Hi Harmeet, fantastitc work with the shortcut for Lightroom.
But I recommended posting on Google+, and even so will not let me download the PDF.
Thanks and regards from Barcelona, Catalonia.
Thanks Josep, I’ve emailed you the direct link pls check you email.
Regards
Harmeet