As much fun as it is to create photos, its, even more, fun creating animated photos!!
You bring the photos to life!! Don’t you agree?
What do you need?
To create such animated images, you need to use Plotagraph + which is an online tool but now they have released iOS App for iPhone and iPad.

In just one week of its release, this App has made it to TOP 50 on the iTunes Store and in Top 5 in Photo & Video category. What it lets you do is revolutionary!!
Check out this video tutorial where I show you how to use and create these animated photos.
How to use Plotagraph +?
Before we jump into the creation process there is one main thing you need to consider when selecting the photo to animate:
- Are there elements in the photo that are typically moving?
Once you’ve chosen the photo you believe is a good candidate for animation, download Plotagraph + from the App Store on your iPhone or iPad. It is a paid app so have your credit card handy!!
- Launch the App
- Select the photo you wish to use
- Now take a look at the interface of the App. My suggestion is to Edit in the Horizontal orientation of your device as you’ll see all the controls of the App this way.
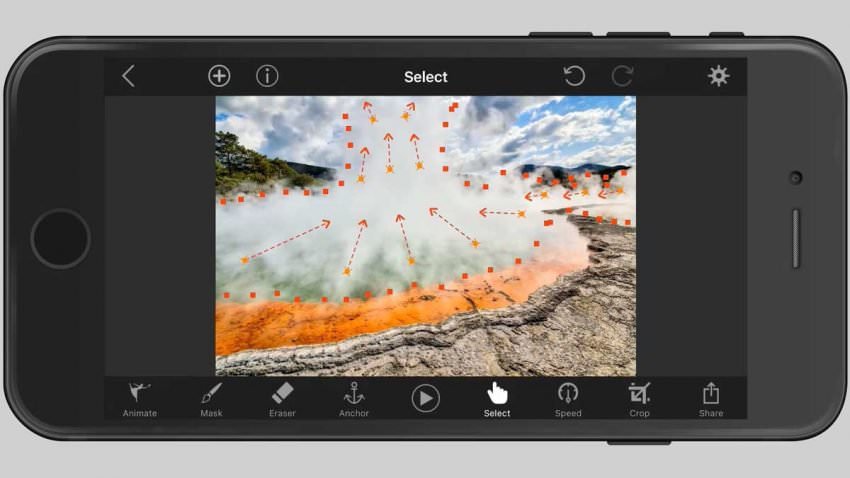
- At the bottom are all the controls
- For the purpose of getting started or familiar with the App, we will use the, Animation, Anchor, Select, Speed, Crop and Preview options.
- To start Animating simply Tap and drag your finger over the area of the image that you wish to move, while making sure you drag in the direction the movement to occur. You will notice that an arrow will appear on the screen. Repeat the process on the various portions of the image that you wish to animate.

- Next, tap the Preview (Play button) and you’ll see the image starts to animate but it probably looks pretty weird right now as it’s wrapping and moving everything near the arrows.
- So next we need to use the Anchor tool to define anchors near the arrow. Anchors will define the points near the arrows that should not move. It’s kind of like the fence in the field where animals can move inside it but can’t go outside.

- Use the Select tool to adjust any anchors. Tap to select and then tap-hold to move. You can also select multiple anchors by tapping multiple points. As you are doing all of this with your fingers it does take a little bit of practice to master the precision of your anchors.
- Next let’s review the Speed, you should consider if the animation or movement looks real. Having the animation be too fast will giveaway that it’s not real. So slow down the speed until the movement looks realistic.
- Finally, you are ready to Crop and export the video. Unfortunately, the crop tools are not as good in the current version so you can either export in the original size or crop in some strange ratios which I don’t understand. I normally just export the video in it’s original image size.
- The export option let’s you resize the video and choose the duration. You can choose from various different durations anywhere from 0.5 a second to 30 seconds.
I am having so much fun playing around with this app and creating beautiful animations that I just can’t help myself. Its so much fun!!
Check out some the animations of mine below. You can also follow me on Instagram to see more animated photos.


